Information for Student Employees
Employee Handbook
Please see the Employee Handbook for any questions you may have.
Logging Work Time
It may sound like a lot at first, but logging hours is an easy process once you learn. However, it is important not to rush when you are entering and reviewing your time, in order to prevent errors and further issues.
Logging Time into TopNet
Step 1: Log in to TopNet
- Navigate to TopNet using your WKU email.
- (https://topnet.wku.edu)
Step 2: Navigate to "Timesheet"
- Navigate to "Employee Services". (This should be the third tab down.)
- Once you are on the "Employee Services" page, click on "Timesheet". (This should be the first link on the list.)
Step 3: Navigate to "Enter Time"
- Once you click the "Timesheet" link, you will be directed to your employee dashboard, which will show your latest pay stub date and other pay information.
- On the right side of the page, there is a column that says "My Activities". Click the gray button labeled "Enter Time".
Step 4: Start time sheet
- After clicking "Enter Time", you will be directed to a page with the title "Timesheet". Navigate to the "Start Timesheet" button on this page.
Step 5: Log your hours worked
- The timesheet will display one week at a time. The pay period start and end date is also displayed near the top left corner of the page. To log your hours, click each date individually, and type in the number of hours you worked in the "Hours" box below the calendar row.
- After typing in the number of hours worked, click the "Save" button on the bottom right of the screen. Repeat for each day you worked.
- Hours worked must be logged in incriments of 0.25. For example, if a student works for an hours and fifteen minutes, they will type "1.25" in the "hours" box. If they work one and a half hours, they will type "1.5" in the "hours" box.
Step 6: Preview
- Once you have entered your hours worked on the timesheet, click the "Preview" button. This is located beside the "Save" button.
- Review the information and your logged hours. Ensure this information is correct.
Step 7: Check and Submit
- After reviewing and ensuring your hours and information are correct, check the box at the bottom of the page. Checking this box means you have reviewed your hours and information are correct, and you are responsible for any errors or changes made using your student ID.
- If you need to go back and fix or change something before submitting, you may hit the "Return" button and do so. Once you have checked the box, you may click "Submit" at the bottom right corner of the page.
Logging Time on Paper Time Sheet
You do not necessarily have to follow these steps in this exact order. As long as all the information is accurate and in the right spots, you can go in whichever order is easiest for you.
Where to Get Paper Time Sheets
You can find physical time sheets in the department office. The Physics and Astronomy department office is located in Room 2009 on the second floor of Kelly Thompson Hall. These are located in a red folder labeled "Time Sheets" on the wall beside the 2009B doorway. If you have trouble finding it, or if there are no more left, ask the office assistant or a supervisor. Office hours are 8:00AM to 4:30PM. You may also print out a blank timesheet.
Step 1: Pay Period Start and End Date
- At the top of the page, there is a box that says "Beginning Date:_________________" and "Ending Date:_________________". Write the beginning date of the payroll period in the first blank and the payroll period end date in the second blank.
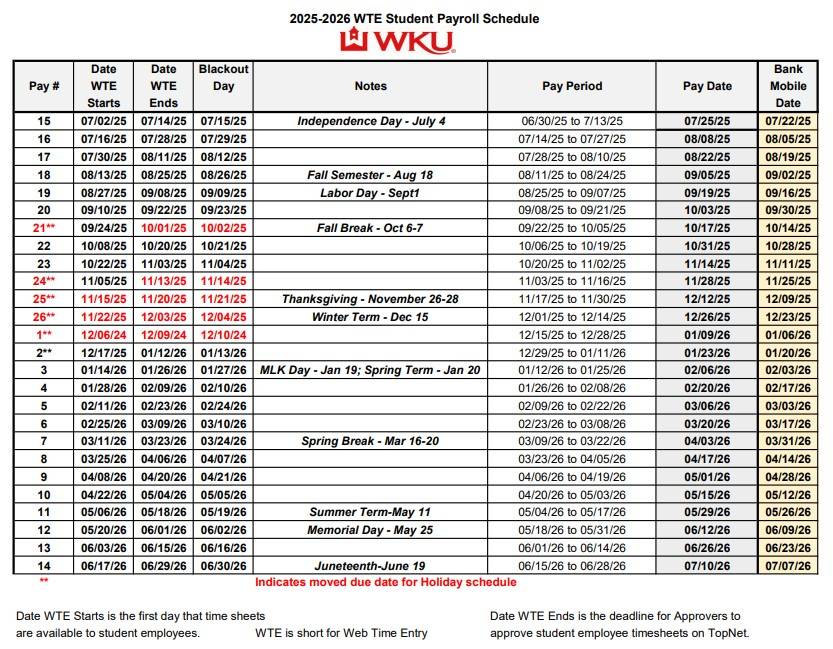
- If you are unsure of the payroll period dates, you can refer to the 2025-2026 Student Payroll Schedule or your employee time sheet on TopNet, which displays the payroll period and end date in the top left corner of the page.
Step 2: Student and Employee Information
- Beside the calendar rows, there are three blank lines for you to write your student and employee information.
- Write your first and last name on the "Student Name" line, your nine-digit WKU ID number for "WKU ID", and your department or unit name for "Department/Unit".
Step 3: Logging Dates
- Write the date each day you work in the "date" column.
Step 4: Logging Time In and Out
- Write your time in rounded to the nearest quarter hour (0.25) in the "Time In" column.
- When you leave, write your time out also rounded to the nearest quarter hour. (Example: If you started work at 12:00 and leave at 4:14 or 4:16, round time out to 4:15. The time you worked would then be recorded as 4.25 hours.)
- If you work 6 or more hours, write down the time you leave for a lunch break and the time you come back in. For example, you may leave for lunch at 12:00 and come back at 12:30. Your lunch may be up to 30 minutes.
Step 5: Logging Hours Worked
- Just like logging time on TopNet, write the number of hours your worked each day individually in each "Hours Worked" box, which is the last box of each calendar row.
- Remember to log your hours in increments of 0.25.
- Do not write anything in the boxes for days you did not work. A blank box indicates that you did not work that day, so it is not necessary to put "N/A" or a mark for the days you do not work.
- You only get a paid lunch (up to 30 minutes) if you work six hours or more.
- Regular hours should include any time worked between 37.5 (the standard university workweek) and 40 hours during the official workweek.
Step 6: Total Hours
- Write the total number of hours worked in the box labeled "Regular" at the very bottom of the "Hours Worked" column. For example, if an employee works for an hour on each Monday and Wednesday, two and a half hours on each Tuesday and Thursday, and works for four and a half hours on Friday, they would write "11.5" in the total number of regular hours for that week.
- *Overtime hours are any hours actually worked over 40 hours during the official work week. (Staying thirty minutes later than normal does not count as overtime.) Only time over forty hours should be logged as overtime in the "Overtime" box. Do not put anything in this box if you do not officially work overtime.*
Step 7: Signature and Date
- Finally, sign your first and last name on the "Employee Signature" line at the bottom left corner of the paper. Signing your name indicates that you have reviewed your hours and information and ensured they are correct, and you are responsible for any errors or changes made using your student ID.
- Write the date beside your signature.
- Leave the "Supervisor Signature" line blank.
- Please see the example time sheet below to see how the sheet should be filled out.
Step 8: Turn in the Paper Time Sheet
- Once you have reviewed and completed your time sheet, turn it in to your supervisor.
Example Time Sheet

This is an example of a completed time sheet. Please refer to it if you need a reminder of what a traditional paper time sheet should look like.
Reminders for Paper Time Sheet
- You can find time sheets in the Physics and Astronomy Department Office, which is located in room 2009 on the second floor of Kelly Thompson Hall. These time sheets should be located behind the office assistant's desk beside the doorway of room 2009B, inside a red folder labeled "Time Sheets". If this folder is empty, ask the office assistant to make more copies if possible. Office hours are 8:00AM to 4:30PM. If you are unable to get a timesheet from the department office, you may print one out using the link to the "Blank Timesheet" in the "Helpful Resources" section at the bottom of the page.
-
Hours must be logged in increments of 0.25 (quarter hours)
-
Example: If a student works for an hour and forty-five minutes, they will write 1.75 hours on their time sheet for that day. If an employee works for two hours and fifteen minutes, they will write 2.25 hours on their time sheet.
-
-
Handwriting must be legible. If writing is difficult to read, it may cause confusion and errors on payroll, so please ensure that your writing is easy to read.
-
Ensure that you fill out all required information on the form before turning it in. This keeps the process running smoothly and prevents errors or delays.
- Overtime hours are any hours actually workedover 40 hours during the official work week. (Staying thirty minutes later than normal does not count as overtime.) Only time over forty hours should be logged as overtime in the "Hrs.>40" box. Do not put anything in this box if you do not officially work overtime.
- Each day should include the beginning shift time, time out for lunch and return time for lunch (if applicable), and time out at the end of the day (rounded to nearest quarter hour).
Backpay Information
**Changes to how backpay will be processed will be implemented after March 9, 2026. Please see "New Backpay Procedures" information below.**
Back pay refers to hours worked in a previous pay period for which payment has not yet been received.This is an error that happens commonly due to employees not turning in time sheets by the due date.
Emails will be sent about every two weeks to inform the employee that web time entry can begin for a payroll. A follow-up reminder email is sent several days before the deadline for time sheets.
It is very important to turn in timesheets and submit hours in TopNet on time to ensure that you will be paid for your work.
New Backpay Procedures
Previously, back pay hours could be uploaded into TopNet when the timesheet opened for the current payroll cycle. However, starting March 9, 2026, if a student employee fails to submit their time during the appropriate payroll cycle, they must meet with their supervisor to explain the missed deadline and complete a paper timesheet. The approved paper timesheet must then be emailed to payroll.info@wku.edu for processing.
Please see the payroll schedule below:
Important Reminders
- Overtime is defined as hours worked beyond 40 hours in a single workweek. Hours cannot be averaged across multiple workweeks to calculate overtime.
- A workweek runs from 12:01 AM Monday through midnight Sunday.
- Back pay refers to hours worked in a previous pay period for which payment has not yet been received. If a student employee fails to submit their time during the appropriate payroll cycle, they must meet with their supervisor to explain the missed deadline and complete a paper timesheet. The approved paper timesheet must then be emailed to payroll.info@wku.edu for processing.
- Only timesheets with Approved status will be processed by Payroll. Timesheets in Not Started, In Progress, or Pending status will not be included.
- Timesheets close at 11:59 am on the day they are due, even if a student is entering their time.
Helpful Resources
2025-2026 Student Payroll Schedule
If you have any additional questions, please contact your supervisor or refer to the Employee Handbook.
A community of faculty, staff, and students engaged in better understanding the physical world.
Some of the links on this page may require additional software to view.