
INTRODUCTION
The analytical stage of forensic anthropology involves answering questions that lead to identification of the individual whose remains are being examined. The questions asked in developing a biological or demographic profile for an individual include the following:
OBJECTIVES
You will be using several osteometric measuring devices to complete this lab. Carefully follow the directions for using these devices to insure that instruments and bones are not damaged. Osteometric equipment is expensive because of the precision with which they are manufactured; special care in using the equipment must be exercised at all times. All measurements must be made in metric units. Ask for help reading the instruments, if needed.
Sliding Caliper
The sliding caliper is used to make linear measurements on bones. We are using manual calipers and digital sliding calipers that run on batteries. Each student should practice using both types of calipers. The level of accuracy is 0.1 mm for the manual and digital calipers.
MANUAL SLIDING CALIPER
DIGITAL SLIDING CALIPER
The spreading caliper is used to make linear measurements around the protrusions on the skull. The level of accuracy is 1 mm but you can estimate to 0.1 mm.
The osteometric board is used to make linear measurements on bones, especially long bones that are larger than a sliding caliper can measure. The units are centimeters, which must be converted to millimeters for comparison with published tables of metric data. The level of accuracy is 1 mm but you can estimate to 0.1 mm.
Carefully handle the instructional casts and bones laid out in the lab, being sure to keep the bones with their labels. Some of the casts are made of brittle plaster and will break if dropped. Some of the ends of the bones where you will be making measurements are very delicate and will crumble if handled improperly. Keep the materials on the bubble wrap to cushion them from the hard table surfaces, and wear gloves when working with real bones.
Record your responses to the questions on the answer sheet provided in the lab. Pencil is suggested for recording your answers.
All measurements must be recorded in millimeters (rounded to tenths place) and must include units. Your answers will be counted wrong if you don't record them in this format.
When working in a group, it is essential that all group members look at the bones and make the measurements.
Use reference books in the lab as needed. Ask the instructor or assistant if you don't understand something.
The lab is due on Thursday, April 3 at the beginning of class. Late labs will not be accepted.
SEX DETERMINATION
The sex of an individual is determined, when soft tissue is not present, by a number of skeletal indicators. Of course, the more indicators used to determine sex, the more accurate the results. However, a forensic anthropologist is analytically limited by the bones present and the condition of the bones.
We will look at several features of the pelvis, skull, and limb bones in determining sex. What we are doing in lab for sex determination does not cover all skeletal indicators of sex, but it will give you a good idea of how a forensic anthropologist determines the sex of an individual using the bones.
Remember that sex determination is very difficult for subadults. The bones we are using in lab are those of adults. Assume pelvis and skull specimens are of Native Americans and limb bone specimens are of Caucasoids or Negroids.
Pelvic Girdle
The pelvic girdle is often cited as the best skeletal element with which to determine sex. We are using the pubis bone, various os coxae features, and the overall shape of the pelvic girdle to estimate sex.
The pubis bone is the most medio-anterior bone of the os coxa, on the medial side of the obturator foramen. The pubis bones of both os coxae articulate dorsally at the pubic symphysis.
Several features of the pubis bone are used in sex estimation; we are examining the ventral arc, pubis body width, and subpubic angle/cavity/concavity (see the figure below).
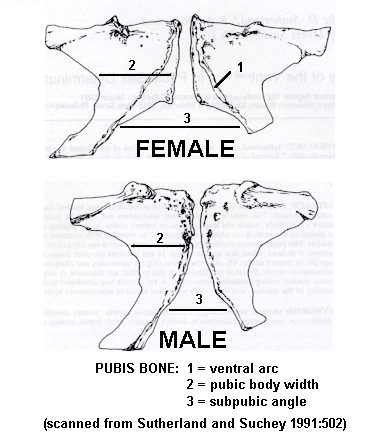
The ventral arc is a roughened projection of bone visible on the anterior surface of the pubis bone. This is a nonmetric trait; it is usually present in females and is absent in males.
The pubis body width is measured from the middle of the pubic symphysis to the obturator foramen. The width is greater in females, averaging about 40 mm, and smaller in males, ranging around 25-30 mm. Be sure to measure from the midpoint of the pubic symphysis.
The subpubic angle (also called the subpubic cavity or
subpubic
concavity) is angle made by the inferior borders of the articulated
pubis
bone. In females the angle is wide and greater than 90
degrees.
In males the angle is narrow and less than 90 degrees (France,
1996:91).
If you only have one os coxa, you have to estimate the subpubic angle
(from
the inferior ramus of the pubis bone to an imaginary line running along
the surface of the pubic symphysis) and multiply by two to get the full
angle.
|
|
|
|
|
|
|
|
|
|
|
|
|
|
|
|
Other os coxa traits used in sex determination include the
following:
obturator foramen, greater sciatic notch, auricular surface (sacroiliac
articulation), and acetabulum. These traits are summarized
in the table below.
|
|
|
|
| obturator foramen | small and triangular | large and ovoid |
| greater sciatic notch | wide, >90 degrees | narrow, deep, <90 degrees |
| auricular surface | high relief, with pre-auricular sulcus | low relief , lacking pre-auricular sulcus |
| acetabulum | small | large |
The overall shape of the pelvic girdle differs between females and males (see the figure below, and refer also to Figure 4.2 and Table 4.1 in France). The pelvic inlet is broader and more circular in females, narrower and more heart shaped in males.

Assignment
Use the calipers and protractors in completing the following analyses.
Examine the plaster casts of the known female and male pubis bones (these are paired bones). Describe the ventral arc, measure the pubic body widths with a sliding caliper, and measure the subpubic angles with the plastic arc provided with the bones. Record this information on the answer sheet. These are our known specimens that you can use for comparison when analyzing the unknown specimens.
Examine specimen PEL1, which is a complete os coxa. Orient the bone anatomically and locate the pubis bone. Record if the ventral arc is present or absent and measure the pubic body width and subpubic angle. Assess the obturator foramen, greater sciatic notch, auricular surface, and acetabulum. Is this a male or female coxa? Why?
Examine specimen PEL2, which is a pair of pubis bones. Orient the bones anatomically. Record if the ventral arc is present or absent and measure the pubic body width and subpubic angle. Is this a male or female pubis? Why?
Examine specimen PEL3, which is the human skeleton hanging in the lab room. Closely examine the pelvis. Is this a male or female? Why? Use the pelvic girdle in addition to ventral arc, pubic body width, subpubic angle, obturator foramen, greater sciatic notch, auricular surface, and acetabulum.
Skull
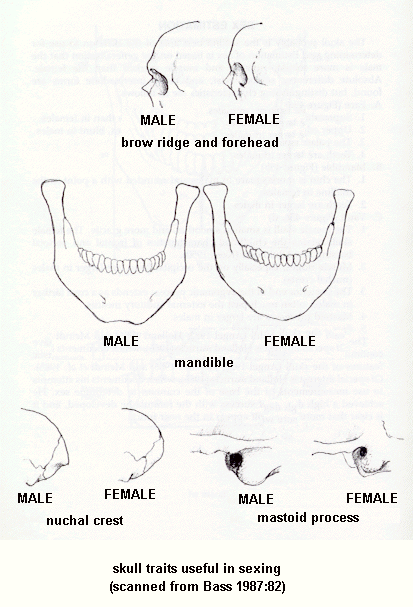
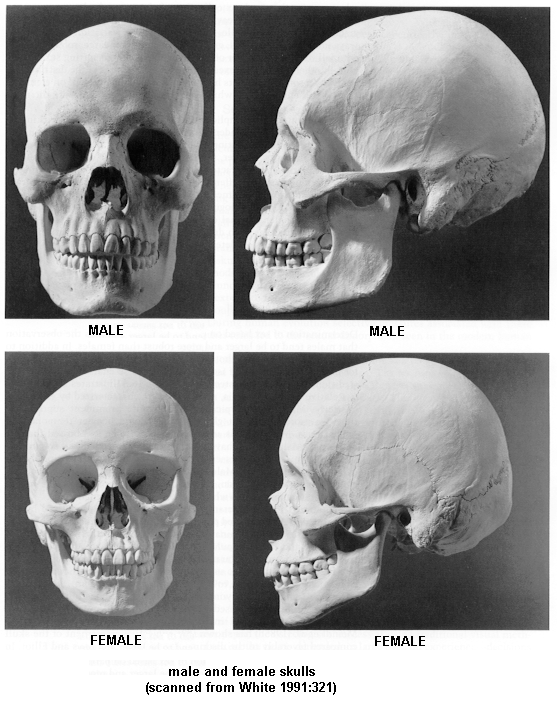
After the pelvis, the skull is the bone commonly used to determine sex. (Of course, the accuracy of sex estimation is greater if both bones are used.) We are examining a number of skull features that are indicators of sex. Many of these features are relative, meaning that the male:female differences are most easily observed when looking at one skull relative to another. This is why one's ability to sex a skeleton improves with experience.
Skull features that are used to distinguish males and females are
listed
below.
| Trait | Female | Male |
| supraorbital ridge/torus | less prominent | more prominent |
| upper edge eye orbit | sharp | blunt |
| eye orbit shape | rounded | square |
| palate | smaller | larger |
| teeth | smaller | larger |
| chin | rounded with midline point, V-shaped | square, U-shaped |
| gonial angle | non-projecting | projecting or flaring |
| cranial vault | smaller, smoother | larger, rougher |
| frontal bossing* | present | absent |
| parietal bossing* | present | absent |
| muscle ridges (nuchal) | gracile | robust |
| zygomatic process | not expressed beyond zygomatic arch | expressed beyond zygomatic arch and beyond external auditory meatus as crest |
| mastoid process | smaller, short | larger, broad |
| occipital condyles | smaller | larger |
(from Bass 1987:81, White 1991:322, Pickering and Bachman 1997:86)
* a boss is a "smooth, round, broad eminence" or bony projection
that is not as prominent as a process (White 1991:33); look at
White pages 57 and 61-62 for photos of bossing
Some of these sex-related skull features are illustrated in the following figures.
Assignment
Compare the following specimens to the photos and descriptions (above) and the male and female skull casts (in the lab). Answer the following questions on your answer sheet.
Examine specimen SKULL1. On the answer sheet, circle all the skull characteristics that you observe. Record N/A (not applicable) for features that cannot be determined because of skull damage. Is this a male or female skull? Why?
Examine specimen SKULL2. On the answer sheet, circle all the skull characteristics that you observe. Record N/A (not applicable) for features that cannot be determined because of skull damage. Is this a male or female skull? Why?
Examine specimen SKULL3 (the hanging skeleton). On the answer sheet, circle all the skull characteristics that you observe. Is this a male or female skull? Why?
Limbs
Ordinarily, the limb bones alone are not used for sexing unless absolutely necessary. But characteristics of the limb bones can be used (alone or in conjunction with examination of the pelvis and skull) for sex estimation.
While forensic anthropologists and osteologists have examined most postcranial bones for evidence of metric and nonmetric differences between the sexes, in this lab we are going to look only at two limb bones, the femur and humerus. Other bones such as the scapula have also been used to determine sex.
Two metric traits of the femur used to estimate sex are maximum diameter of the head (vertical diameter) and bicondylar width. The figure below shows how to measure these traits.
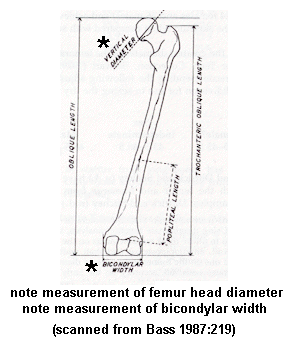
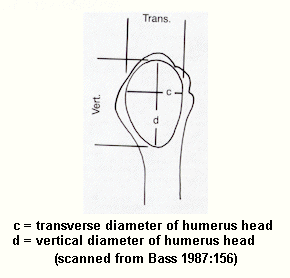
Three metric traits of the humerus used to estimate sex are maximum diameter of the head (transverse and vertical), epicondylar width, and maximum length. The figure below shows how to measure these traits.
These metric traits vary between males and females in the following
ways. All measurements are in mm. If the race you need is not
present
in the table, use another race.
| Trait | Female | Probably Female | Indeterminate | Probably Male | Male |
| femur head maximum diameter (Negroid) | <41.5 | 41.5-43.5 | 43.5-44.5 | 44.5-45.5 | >45.5 |
| femur head maximum diameter (Caucasoid) | <42.5 | 42.5-43.5 | 43.5-46.5 | 46.5-47.5 | >47.5 |
| femur bicondylar width (Negroid) | <72 | 72-74 | 74-76 | 76-78 | >78 |
| humerus head max diameter vertical (race?) | <43 | - | 44-46 | - | >47 |
| Trait | Female | Male |
| femur head maximum diameter (Caucasoid) | 43.8 | 49.7 |
| femur head maximum diameter (Negroid) | 41.5 | 47.2 |
| humerus head maximum diameter vertical (race?) | 42.7 | 48.8 |
| humerus head maximum diameter transverse (race?) | 37.0 | 44.7 |
| humerus head maximum diameter transverse (Native American) | 38-39 | 43-44 |
| humerus maximum length (Negroid) | 305.9 | 339.0 |
| humerus epicondylar width (Negroid) | 56.8 | 63.9 |
Assignment
Record all answers on the answer sheet.
Examine specimen FEMUR1, which is a Negroid proximal femur. Orient the bone anatomically and locate the head. Measure the maximum diameter of the head. Measure the bicondylar width. Is this a male or female femur; what is the sex of the individual based on this bone?
Examine specimen FEMUR2, which is a Negroid distal femur. Orient the bone anatomically and locate the condyles. Measure the bicondylar width. Is this a male or female femur; what is the sex of the individual based on this bone?Examine specimen HUM3, which is a Negroid complete humerus. Orient the bone anatomically and locate the head and distal condyles. Measure the maximum diameter of the head, the epicondylar width, and the maximum length. Is this a male or female humerus; what is the sex of the individual based on this bone?
REFERENCES
Bass, W. M. (1987) Human Osteology: A Laboratory and Field Manual (3rd ed.). Missouri Archaeological Society, Columbia.
Byers, Stephen N.France, D. L. (2003) Lab Manual and Workbook for Physical Anthropology (5th ed.). West / Wadsworth, Belmont, CA.
Sutherland, L. D. and J. M. Suchey (1991) Use of the Ventral Arc in Pubic Sex Determination. Journal of Forensic Sciences 36(2):501-511.
White, T. D. (1991) Human Osteology. Academic Press, San Diego.